Self indulgence through sewing.

Latest

Steamcon 2013 Harem Pants, Completed!

Hurray! I wasn’t sure I’d have time to make a second set of harem pants after the first set turned out wimpy and ill-fitting and incredibly satin. BUT I DID!

And here they are:

Harem Pants, Version 2

Harem Pants, Version 2

They’re still based off the pants in the Simplicity 5359 pattern set, but I increased the width of each leg to a full 60″ of fabric (the original pattern only called for about 40″ for each leg) and increased the pattern length by 1″ to 43″ long. I would have increased it more, but I knew I’d be losing the encased elastic channels at the ankles in favor of gathering with my sewing machines pleating foot and binding the raw edge with  left over bias tape from my jacket. I hate the feel of elasticed ankles.

I also discovered (through my first satin pair of harem pants) that these pants fit better backwards than they did frontwards. Very strange, but since I was planning to move the zipper from the back to the front ANYWAY, that meant one less pattern change to hold in my head. Huzzah!

I was a little worried about wrangling the bulk of all this fabric into the waistband and ankle bands, but a quick run through with my trusty pleating foot too the fabric down to a manageable level. Then I ironed and ran two lines of basting stitches over the pleats and gathered it all into the waistband.

All pleated up and ready to be assembled.

All pleated up and ready to be assembled.

So yippie, my costume is pretty much done with one day left to spare.  🙂  Well, maybe not done done since I still have to add some hooks and eyes and decide how I’m going to finish the teal dress’s hem (I’m leaning towards fraying it out and having fun with some fabric distressing) but that shouldn’t be too hard tomorrow.  🙂

I’m really looking forward to Steamcon this year!  😀  If you see me there give a hollar!  Sometimes I think I might have Bitchy Resting Face, but be assured I really do love talking to and meeting new people.  🙂

Steamcon 2013 Make-up test

For some reason I couldn’t bring myself to work on the second set of harem pants today.

Call it costume burnout perhaps. Or maybe I’m just expanding my project to fit the amount of time I have left. Like a hermit crab growing to the size of it’s shell.

I DID go buy the fabric today and it’s sitting for me on my cutting board. Maybe I’ll cut it out before I go to bed.

OR MAYBE I’LL JUST PLAY WITH MAKE-UP!  😀

Steamcon Make-up Test

My face only has one expression, BLUE STEEL.

I’m on the fence about the little white dots?

On the one hand, I love them, and I may never have an excuse to do them if I don’t do them with this costume. On the other hand, they’re totally unjustifiable in a historical context. Moari? Yes. [EDIT: Nope! I was totally wrong! My bad, thanks Ista for letting me know. Maori tattoos are FANTASTIC but nothing like what I’ve got going here. Oops.  🙂 ] African? Sure. China? Russia? Persia? India? ……………ehhhhhmmmmaaaaybeeeee??? ………….Maybe I just wont care because they’re awesome and this is Steampunk? Your thoughts?

This is also the heaviest smokiest cat eye I’ve ever applied. I maybe don’t hate it? Though I think if I’m gonna do it for-reals I need to get myself some cream eyeliner and an angle brush. I used an eyeliner pencil this time around and it’s a little blobby looking.  Is the point at my tear duct too much?

Also, you can just barely see it but I’m wearing the awesome braid extension Jean made me. I love this frickin’ thing.  😀 I want to just wear it around everywhere I go, like I would with various costumes my mom made me when I was 3. But if I did that then it would turn into a terrible ratty braid. So I wont. I’ll leave it alone. For now.

Steamcon 2013 Work In Progress

I meant to update sooner, but I was so scared of my deadline (less than two weeks from idea to convention) that I just got started working right away and haven’t had time to write up any posts.

But now that I’m a few days away from the convention, I feel like I’ve made enough progress to take some time to step back and breath a bit and show off my progress.  🙂

This year’s Steamcon theme is “Around The World” Their website proclaims:  “This year Steamcon takes you on a journey to exotic locales! Meet Peshawar lancers, and Japanese automaton geishas, ride mechanical elephants and hot air balloons, see what steampunk is like on the other side of the globe!” How cool is that?  🙂  I was getting a little bored with European Victoriana anyway this year, so an excuse for a change of pace was really refreshing.  🙂

In my last post, all I had was an awesome hat and some fabric samples from stores around Seattle. So, starting from there, I shamelessly traced over a Simplicity pattern to plan out my ideas, and came up with this concept for my costume:

My planned costume for Steamcon 2013

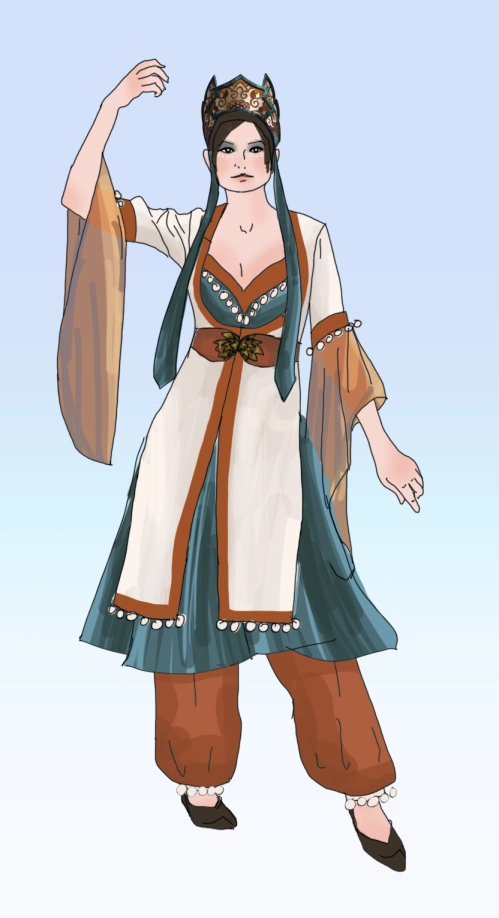
Not bad, eh?  Well, I hope not anyway since what I’ve made by now is pretty close to my original drawing.  😉

I wanted to go with a Pan-Asian look and feel to match my lovely hat of un-traceable and questionable-authenticity. (Seriously, does anybody know where or what this hat might be? I’ll be the first to admit that before I started this project I was not very well versed in anything other than European historical costume, but I’ve been keeping my eyes open for 2+ years and the closest I’ve found are some fabric Chinese Bridal Crowns/Phoenix Crown… but saying they were “close” is a massive overstatement…There MUST be something closer.)

I was also under a very tight deadline, so I had to make due with altering pre-existing patterns. No fancy-pants drafting or muslin alterations for me this time around!

I figure if anyone asks for the origin of my costume I’ll just say my hot air balloon lands where it lands, and I have no idea which countries I’ve traveled to.  😉  That’s my story and I’m stickin’ to it!

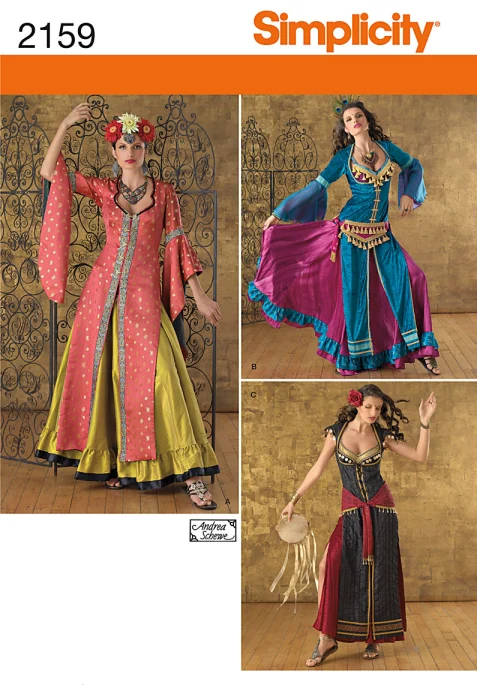
The jacket would be based off of Simplicity’s 2159 “Misses’ Belly Dancer ghawazee coats and belts costume sewing pattern.”

At the time I drew up my concept, I thought this pattern included some sort of top/bra/bodice like what was shown in the sleeve art, but SURPRISE! that was a separate pattern (Simplicity 2158 for those interested.) And in the end I really didn’t want to pay for a third pattern (did you know Joann wont apply any coupons to their patterns? I did not realize until this project. Hrmph.) So, I ended up cobbling together my own bodice pattern for this costume. So much for not wanting to draft anything myself this time around, pfft!

Simplicity 2159

The pants and skirt would come from Simplicity 5359:

Simplicity 5359

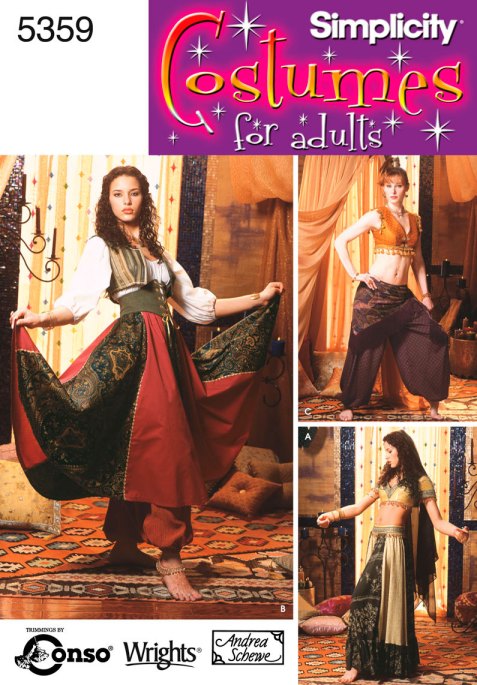
A little note to myself in the future if I ever re-use this plan: 8 yards of fabric is WAY more fabric than this skirt requires, especially if it’s all done in one fabric rather than two as the pattern specifies. I probably could have managed with 4 or 5 yards with fabric to spare. Now I have a ton of teal fabric I don’t know what to do with.

At first I worried I might have to make this pattern’s little corset/waist cincher too, but I realized I had an elastic belt in my closet that matched my plan perfectly, so I drew that in instead.

I’ve had a lot of accessory luck with this costume so far.  🙂  I have a pair of black and gold Jutti I bought at the same time as my hat that I’m trying to break in before Steamcon, and I’ve got some brassy jewelry that will go well with this costume, too.

My (almost) final fabric selections:

Fabric Selections

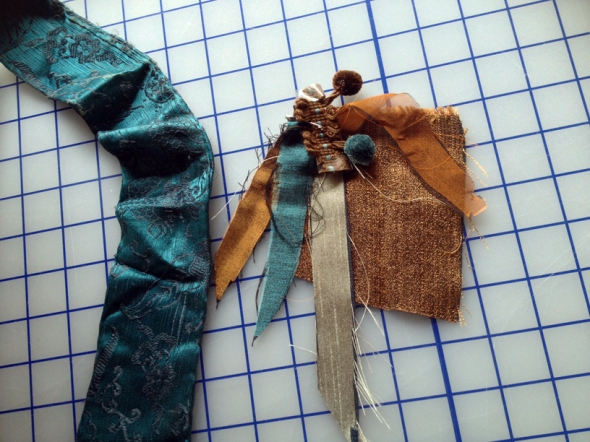
From left to right, the patterned teal is my existing hat fabric I was trying to match. The brown “Copper Shimmer Satin” would be for the jacket bias binding, the jacket lining, and the harem pants (though I would later regret this decision.) The teal satin (“Shimmer Satin” again) would make up the bodice and skirt, and the silver fake dupioni would make up the main body of the jacket.  The pompoms were my first pass idea for the trim, the brown rougher woven fabric was a runner up for the harem pants, and the beautiful copper silk chiffon would make up the sleeves.

At first I was so excited to find that blue and brown pompom trim, but after drawing up my concept I realized that everywhere I wanted to use the trim it would be backed with either teal or brown fabric, making it practically invisible. Not good. I ended up going back to Pacific Fabrics a few days later to find a different trim that would have a higher contrast against my fabrics.
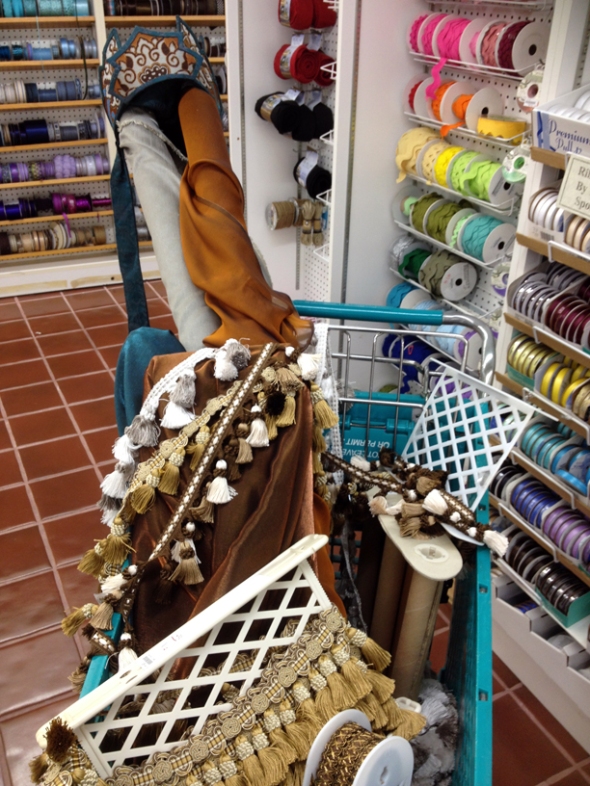
Picking out a trim

My choices were:

A) White/gray. I thought this would be the winner as it was the closest to the white pompoms in my original concept, but in person they just looked SO bright and artificial. They were also the “messiest” in terms of tassel drape.

B) Golden. Mmmm beautiful trim, lovely smooth tassels, ornate woven banding, and the most expensive option out of all three. When you’re buying 110″ of trim, costs start to add up.  😦

C) White/brown. I really liked this one in the store as I thought it got me the white of my original drawing while not being so artificial looking as Option A. Unfortunately, there wasn’t enough left on the bolt for my purposes (there was only about 40″ left) so if I were to use it I’d have to remove about half of the trim I was planning on using. And that was after I’d already edited out the trim around the ankles. Bummer.

So, what to do when you don’t know what to do?  Go home and think it over. That night when I looked back over the photos I’d taken, I realized that Option B was my favorite, both in terms of how it looked in real life and how it photographed, but I still couldn’t get over the price. And then I checked my email and saw that Pacific Fabrics was having a 40% off Columbus Day sale the next day. Hurray! That trim was coming home with me, me me ME! I think this costume is charmed, I’m usually never this lucky. 🙂  Maybe the sale helps to make up for all the extra fabric I ended up accidentally over-buying for this project.

Pattern pieces on the floor

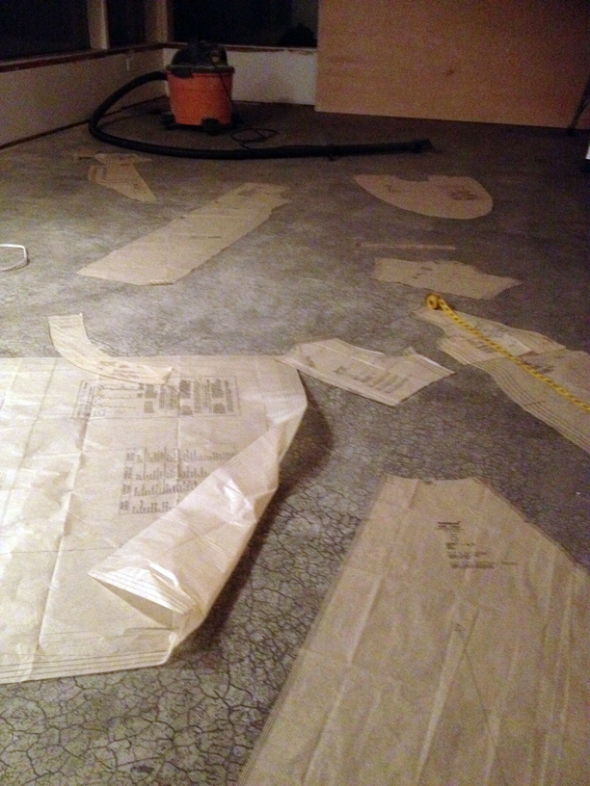
The best part about sewing in a construction zone?  Lots of room to lay out pattern pieces.

After the first 3 or 4 days, I had the teal under dress and harem pants (made of the copper shimmer satin) about 90% done. It was at this point I realized I looked like a giant satin monster, and so there are no photos. I was making good time though, and I resolved to move on and work on the jacket with the plan that if I had a day or two left by the time the jacket was completed, I would return to the satin harem pants and re-make them in the rougher material at the end of the project.

On to the jacket! I really wanted to incorporate some of the swirl motifs from the hat into the jacket, so I decided it was time to bust out the Heat’n’Bond and do some appliqué.

Jacket Applique using Heat'n'Bond

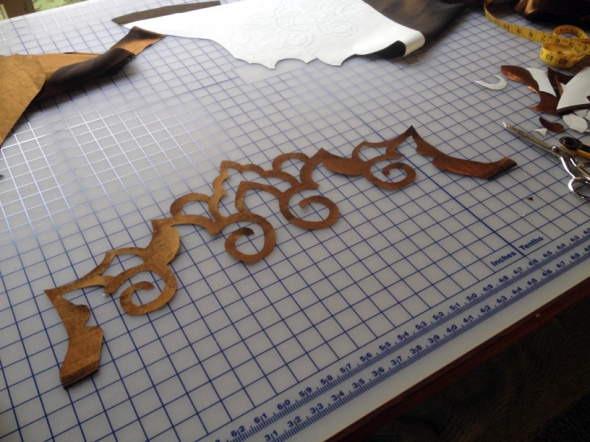
Lookin’ good so far. To get to this point, I drew out my pattern in Photoshop, printed it out at the size I wanted, cut out the shape from my printed copy, ironed my fabric onto the heat and bond, traced the pattern onto the heat’n’bond paper backing, and then cut out the pattern on the fabric. I could then remove the paper backing from the fabric, and iron the design onto my jacket pieces. The heat of the iron activates the glue.  🙂

Then it’s just a matter of topstitching over the pattern with decorative thread, and you’re done!

Rrrtttttt!! *sound of record scratching*

Um. Well. Sorta. That’s how it was SUPPOSED to go anyway. In reality, after I followed all of those steps I got a great big pucker-fest.

Puckered Fabric

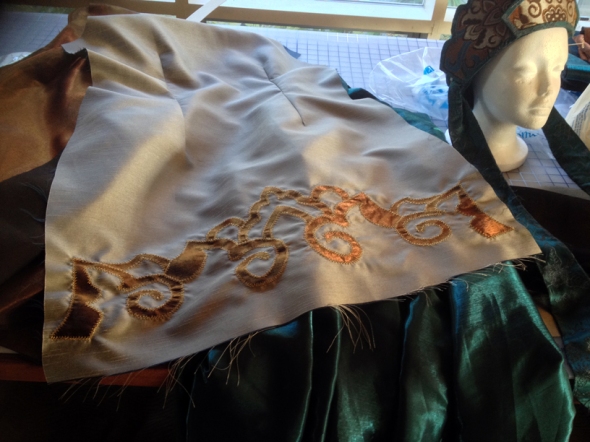
Needless to say, I was not pleased. The puckers wouldn’t iron out. Good thing I did the back piece first. No time to re-do, so hopefully nobody will notice. And if they do notice, I’ll already be walking away. Ha!

So EVEN THOUGH Heat’n’Bond says that it’s it’s own stabilizer and nothing additional should be needed, I went out to Joann’s the next day and got some heavy-duty tear-away stabilizer for the front panels. (So heavy duty I couldn’t actually tear it all away, I had to just cut pretty-close. Sigh. I’m not good at finding middle grounds it seems.)

No more fabric puckers!

Ta daaaaa!

Mmmmmm so smoooooth.

You can also see the gold thread stitching detail I used to hold down the applique in this photo. It reminds me of a Mandelbrot Set.

At some point during the last week (my memory is getting a bit fuzzy) my buddy Jean came over to help me make yards and yards of bias tape and a big ole’ fluffy braid hair extension to hide the fact that my hair doesn’t touch my shoulders. She was a very welcome guest, and I think she contributed mightily to me not burning out halfway through last week. Of course, this distraction also means I completely forgot to take any photos, and then also haven’t documented any additional progress up until now.

So, with the magic of the internet, let’s just fast forward to last night’s progress!

Steamcon 2013 Costume Progress!

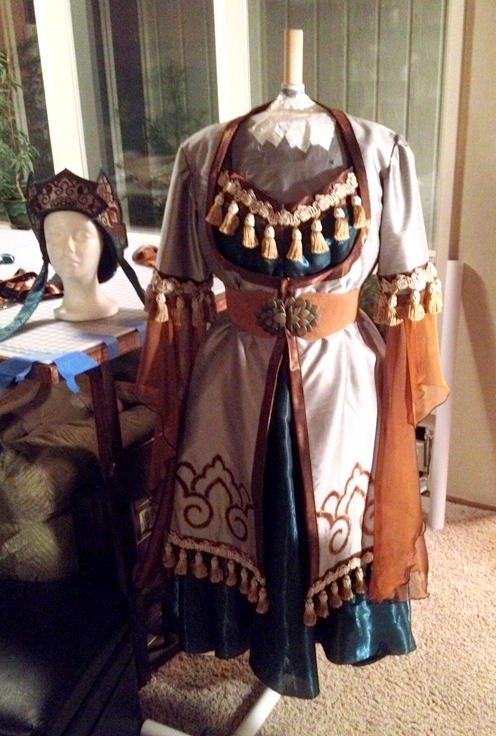
The teal Franken-dress is done! (well, besides for taking up and finishing the hem. I call it the Franken-dress based on how many pieces I had to cut up and modify to get the bodice fitting me passably correctly… guh. My dress form is made to fit my corsetted form, not my natural form, so every alteration had to be made by myself while I was wearing the damned thing. At least it’s all hidden under the jacket so no one can see my shame. (Except for you dear reader, reading this now. You now know my shame.)

And the jacket is done! (Er, well, I need to add some hooks and eyes… but that’s like, practically nothing in the grand scheme of things!)

And YES! ALL THAT TRIM IS ATTACHED! (I had to sew it all on by hand… and it was THICK stuff to get through, lemme tell you.)

And the slippery expensive chiffon is attached to the sleeves and hemmed! (THANK YOU narrow rolled hem function on my serger!)

And I still have 3 days until Steamcon! Which means I can re-make my harem pants in the rougher textured fabric, and maybe even take a trip down to Sephora to get some new eyeliner and make-up tips.  🙂

I hope I’m not jinxing myself (since technically I still want to make that second pair of harem pants and you never know what could happen between then and now,) but I think this may be the first convention I’ve made a costume for where I haven’t been sewing right up until the morning of.

Amazing!

Hey! I’m not dead yet!

You may have noticed it’s been awhile since my last costume posts. Long story short, my husband and I bought a house and I’ve been without a sewing room for almost a year! I’ve been trying to hold back from sewing for as long as possible, but with Steamcon fast approaching in 2 weeks, I couldn’t stop feeling like I needed to make something. Like, staying awake 5 hours past when I go to bed obsessively photoshopping my plans need.

You see, I’ve had this awesome hat for a few years now:

Mysterious Hat

I picked it up two or three years ago at a thrift store in LA that specializes in used movie and theater props (why oh why does LA have to be so far awaaaay?)

I have no clue where this hat came from or what it was used for, but it’s been calling to me to make a costume for it. AND this year’s Steamcon theme is Around The World which means it’s a perfect year to go a little less traditional English Victorian with my costuming, AND Professor Elemental is coming all the way from England and I love Professor Elemental so it simply would not do to not at least put in an effort.

So. With two weeks until Steamcon, I’ve decided to turn our mid-renovation living and dining rooms into a temporary sewing room.

Setting up the "sewing room"

Setting up the “sewing room.” Why yes, that is a table built onto the top of a futon. Small apartments called for creative solutions!

This also means you should start seeing more posts from me over the next two weeks.  🙂  Hurray! Content!

Alice in Wonderland

In my continuing saga to try to get this blog caught up to my present day project, let’s talk about my Alice in Wonderland costume!

The final costume:

My Alice Reference, screen capped from the 2010 Un-Anniversary re-release:

My goal for this project was to make my costume as movie accurate as possible. Features to notice are the blue collar (Disney park Alice’s often have white collars for some reason) the bloomers which cut off below the knee with a simple fabric ruffle, the white fabric petticoat layer under the blue circle skirt, and the apron construction (the only seam appears to be below the waist tie, open back, no ruffles on shoulder “wings”, etc.)

Before I started this project I also finally got around to making myself a duct tape dummy dress form, so I was able to draft this whole dress by myself. I think I can safely say this is the first project I haven’t had to use any commercially available pattern to start with. Level up?  🙂

It wasn’t all sunshine and roses though, I had a hell of a time finding the right fabric for this. At first I figured, “Well, I can probably just use cotton broadcloth, can’t go wrong with that!” so I trundled down to JoAnn’s to pick up a few yards.  Big Mistake. Joann’s carries a fabric brand they call “kona cotton,” but it is just terrible. You’d think you’d be able to iron cotton on the cotton setting, right?  NOPE. My iron was leaving glossy iron marks all over the Joann’s cotton. Blurg.  At this point I sorta wrote off all cotton, thinking the problem was kona cotton itself and not specifically kona cotton FROM JOANN’S.

On my next trip down to Portland I dropped off at my favorite big fabric store, Fabric Depot, and picked up some beautiful blue matte charmeuse-ieish fabric thinking that maybe my problems with the cotton were branching from it being not fancy enough. I got about as far as mocking up the bodice and collar with this fabric before deciding this new fabric wasn’t really working out like I’d liked, either. 😦 Even with lining, the new fabric was just too droopy and slippery and difficult to work with. It was showing every bump of the corset below, and it was photographing too dark. At this point I was sort of at a loss of what to do, the convention was coming up in less than three weeks, and I wasn’t happy with either of my fabric choices. I needed something that would be easy to work with, relativly inexpensive, with a clean drape in the right color. It was at this point my husband suggested that maybe my initial choice of cotton broadcloth wasn’t such a bad choice, and that maybe it was just a problem with Joann Fabric’s fabric quality. So we took a little field trip to Pacific Fabrics to check out their supply. To my surprise, their Kona Cotton was noticeably nicer than Joann’s, I couldn’t see light through it, it held a pretty nice drape while also being able to hold a firm edge, it came in a nice muted bright blue (muted-bright?) and once I got it home and test ironed it on cotton-heat without any problems, I knew I’d found my fabric. Hurray! Now to just finish making the thing.

I like taking test shots while working on things so I can do paintovers in Photoshop to see that I’m going in the right direction. This is a test shot I took after finishing the bodice using the new cotton. It also shows off the wig I ordered (before cutting and de-curling it a bit,) the bloomers I made, mary jane shoes picked up on sale, and my white Dear Celine Frothy Petticoat I, ordered from ClobbaOnline. In retrospect, I wish I’d ordered something a bit longer and fluffier. In the final costume I ended up wearing an additional malco modes 582 petticoat borrowed from my friend Claire, and in some of the photos you can see a bit of a fold where the skirt passes the petticoats. I’m not really happy with how pointy the darts are in the bodice, but I knew these would be covered up by the apron. If they weren’t covered up, I think I’dve definitely gone back and rounded them out a bit more.

On left: Dress with circle skirt pinned on and apron pattern draft taken at night with just the Dear Celine petti.

On right: Dress with circle skirt (and white fabric petticoat) sewn on, with both the Dear Celine petti and Malco Modes Petti, photographed in natural light.

The above photos show my muslin draft of the apron. You can see that none of the edges are hemmed and that I had to take out a little length at the waist. I also hadn’t sewn in a zipper yet. But at least it’s looking like Alice!

After this point I don’t have many progress photos – too busy getting the thing finished!  I set in the zipper, finished up the final apron, acquired white tights, made the black head bow out of fabric scraps left over from my black Steamcon skirt, and made a purse out of a Cheshire Cat plushy.

I do have a few makeup test shots that show me experimenting with how-much-makeup-is-too-much-makeup, and trying on the blue circle lenses (Max Pure Blue from iLoveCircleLenses.com) I picked up for the costume. (My eyes are naturally a green/hazel, you can sorta see them in the center since my eyes aren’t very dialated.)

So, on to final photos!

And my favorite photo from the convention:

Whee, so many photos!  🙂

Quickest Costume Ever: Last Minute Derpy

I suppose this post could be subtitled something like: “And you thought this blog was gonna be all Victorian Garb”  😉  Nope!  To be truthful, while I was in the midst of all that hand sewing needed to construct my elliptical hoop skirt, I was watching a lot of TV. No, I take that back, while I was doing all that hand sewing, I was watching a LOT of My Little Pony: Friendship is Magic.  “……….Wait, what?  But you’re a grown woman, Melinda,” I can hear you thinking – except not, because if you knew me you’d not be too surprised.

But if you don’t know me, you would have a right to think I might be a little off my rocker for spending hours and hours watching a show intended for little girls. Except I’m not! Not in this context, anyhow. As a child of the 80’s (and a child of parents who loved thrift stores and garage sales,) I was bit by the My Little Pony bug pretty dang early and at one point I had amassed a pretty large collection of G1 Ponies. While I wouldn’t consider myself an active collector anymore, when people heard My Little Pony news, they’d pass it on to me. And so I happened to be passed the link to the first episode of Tara Strong’s 2010 reboot of My Little Pony a few days after it first aired on The Hub. And hoo boy, was I expecting a train wreck! The ’90’s and ought’s have NOT been good to My Little Pony. But as I watched, I found myself enjoying the show. The art direction was fantastic, the characters likeable, and the plot had finally re-expanded past G2 and G3 conventions of “Oh NO! The Princess’s cupcakes got crushed! What’ll we dooooo?!?!” – I was hooked. And so were a lot of other people.

And so, by this internet following, I discovered a little pony by the fan name of Derpy Hooves.

A product of either animation error or mischievous layout artist, Derpy was so dubbed for her ridiculously askew eyes. Who was this background pony? What could her role be in Ponyville? Was she a total nutter or merely temporarily lost in her own quirkiness? She quickly became an internet fan favorite, and I realized what I wanted to do for the rapidly approaching Emerald City Comic Con. The convention that was 3 days away.

With such little time to prepare, I knew I’d have to take some short cuts. My first order of action was to find myself a base to work with. I knew I wanted my costume to be gray with yellow/orange accents, but past that I was at the mercy of the thrift store. I came home with a pair of gray corduroys, gray pumps, a yellow blouse, and a gray dress that was about a size or two too small in the hips.

Like this, but, you know, way too small for me. Still, it was the most promising option, so with the corduroys and blouse as back up, I started my dress surgery. Since I knew I wouldn’t be able to find an exact fabric match, I decided on using some darker gray fabric from Jo Ann’s to add triangular skirt gussets – this way I would be able to add some extra width to the hips, and incorporate the dark gray fabric I planned to use for additional accessories into the dress. I also found some quilters cotton printed with a gradient from dark red-brown, through orange, to yellow, to white. The orange/yellow looked to me exactly like the gradient of Derpy’s eyes, so I picked up half a yard’s worth to make into a ruched waistband for the dress. And thus began the 2 and a half day sewing and crafting marathon!  But I got it done!  😀

Thanks to my buddy Jean for taking these great photos for me!  🙂  In this photo you can see the contrasting gussets I added to the skirt and the rushed gradient waistband. I also made up arm and leg warmers to mimic hooves while still keeping with the gijinka look, and hand sewed on circles in blue felt on both sides of my skirt to match Derpy’s cutie mark. (I need to go back and add more detail to these.  It’s on my list of things to do if/when I ever re-wear this costume. Along with like a bajillion other things, lol – this was a very quickly made costume!)

I got super lucky with the wigs used for the head and tail – thank goodness that Derpy is a blonde, and huzzah for the Pacific Northwest Costume shop in Redmond. They helped me find a good enough quality wig that matched Derpy’s mane, and a cheap-enough-that-I-wouldn’t-mind-trashing-it matching blonde wig for Derpy’s tail. The wig for her tail began life as one of those long blonde hippie wigs with a sewn on headband. I removed the headband, and started gathering the wig around the skin top into a ball using a needle and thread. And a little bit of hot glue. I attached the compacted wig ball onto a piece of gray felt for stabilization, and attached a giant safety pin so that I’d be able to pin the tail onto my costume on top of the zipper up the back. I finished the tail up with a choppy haircut, and that was that!

The wings are made out of stiffened felt. I grabbed a screencap of a pony’s wing, and then laid the wing screencap over a photo of myself to determine the size I should print out my template. I then mocked up templates for each section of wing, printed them out at the correct size, cut out the felt, traced the edges with a dark gray copic marker for definition, and assembled with ribbon and hot glue. Ta da! These wings are super light and actually pretty sturdy (sturdiness is a must when dealing with props that extend past your shoulders in conventions.)  That said, if I were to remake these wings I would have attached the ribbon a few inches farther away from the center point. As they are now, they like to rotate, so I have to watch to make sure they stay straight. I should’ve thought about that while making them.  🙂

While searching at Jo Ann’s for fabric, I noticed some blue glass beads that reminded me of Derpy’s symbol. I strong 7 of them onto some left over ribbon for a quick and easy necklace.  The ears are made of Crayola Model Magic in gray. I split one package into two balls, and shaped an ear out of each ball, and hot glued them to a silver cloth covered headband.

In fan cannon, Derpy Hooves is the mailpony of Ponyville, so of course I had to have letters to deliver. Thankfully I had an old bag from college that matched the brown mail bag she’s often drawn with, so all that was left was to make some letters. I used my trusty gray copic marker to outline the seams of each letter envelope, and finished each letter off with a heart shaped sticker.

Derpy also loves muffins.  And so do I.  🙂

Elliptical Hoop

Fresh off the success of my bustle for Steamcon II, I decided I’d try stepping it up a notch and make myself an Elliptical Hoop like the ones used to support skirts from a short transitional period between around 1865 through 1870. It’s a weird period where you can literally see the fullness of the traditional circular crinoline cages on the 1850’s and 1860’s (think United States Civil War era ladies fashion) moving further and further back to eventually become the bustles popular through 1870’s through 1890.

Above is a fashion plate from 1860 showing the circular hoop silhouettes which were popular from the 1850’s through ~1865.

This fashion plate from 1868 shows the elliptical hoop skirt silhouette with fullness moving to the back of the skirt and skirt designs transitioning away from radial symmetry. Is anyone else totally in love with the asymmetrical design used on the white and blue dress on the far left?  I’m smitten.  🙂

By 1869 you can really see the transition – there’s still more fullness to the sides of the skirts than there is with a lot of later bustle dresses, but the bustle has definitely established itself and caught on.

So are you curious to see what might’ve been supporting those skirts?  🙂

I say “might” because the more I research the more I find different hoop and bustle designs – they really weren’t standardized at ALL, but I’ve seen a few elliptical hoops that look very similar to this, and it’s such a lovely photo, isn’t it?  🙂  It looks to me like a very early elliptical hoop, since it seems to emphasize the push backwards, but without any of the bustling you see later on in the fashion plates. However, it’s entirely possible that the wearer could have added additional bustle pads above the hoop to create the additional fullness. Victorians were pretty resourceful.  😉

Long story short, I’m pretty damn smitten by elliptical hoop style dresses, so I set about to looking for a pattern to make my own. Again I turned to Truly Victorian (this whole blog is starting to feel like a huge advertisement for TV, lol – but hey, they make GREAT patterns!), and ordered their 1865 Elliptical Cage Crinoline pattern and three 12 yard rolls of hoop wire. It’s using a different design then the elliptical hoop shown above, and uses ties placed at the rear to create the elliptical bustle shape. It also uses fewer stays (hoop wires?) than the historical example. I believe modern hoop wire has more strength than historical wire, but it may just be to save material costs? I think more wires may be the way to go though if I ever make another hoop skirt – it’s easier to hide the wires under petticoats if you don’t have huge gaps between each wire.

I also ordered the pattern for the 1865 Elliptical Skirt since I knew eventually I’d want to make skirts and petticoats to cover the hoops.  🙂

The above photo from Truly Victorian shows what their finished hoop skirt looks like when completed.

And here is my finished Elliptical Hoop with muslin Elliptical Skirt petticoat (and totally asynchronous striped top – lol) :

Be warned!  This hoop took a LOT of hand sewing for me!  I wasn’t able to fit the skirt with wires under my sewing machine, so I had to hand sew each individual point where the hoop meets up with the stabilizing ribbon. I’m sure there must be an easier way to do this, maybe if I’d waited to add the hoop wire into the bone casings until after I’d sewn the casings to the stabilizing ribbons?  But there’s a step where you need to have the hoop wires in the casings before you sew the casings to the ribbon in order to check balance and correct joining placements.  So blah. I don’t know. Maybe the trick is to not keep your sewing machine in a tiny corner  on your desk next to your computer where there’s no room for giant hoop skirts.  🙂

But I digress.  Back to the skirt!

This skirt is almost too big to fit in my hallway.  🙂  Almost.

Obviously I still need to hem the petticoat, and I think I may add some rows of ruffle to further disguise the hoop wire underneath, but I keep putting it off with the thought that eventually I might buy my sewing machine a ruffling foot, and then wouldn’t I feel foolish for hand ruffling a whole skirt?  😉  It’s faultless logic, really.

I haven’t really decided what to do with this hoop skirt yet, but that might be a topic for another post.  🙂

Steamcon II!

With Steamcon II fast approaching, I had to figure out what all I could get done before the big day (remember, I only had about 3 weeks from start to finish until Steamcon, including ordering patterns, finding fabrics and corset supplies, and creating accessories, so time was of the essence.)

I ended up deciding that since this was Steam Punk and not strictly historical recreation, I could get away with no bodice. Not creating a bodice for my outfit also had an added bonus of allowing the hard work I’d done on my corset and chemise to be visible. Win.  🙂  So that left me with skirts and accessories. Before I get into the nitty gritties, wanna see the final product that I ended up wearing to Steamcon?  Of course you do.  🙂

Ta da!  Steamcon II was held at a great hotel down by the SeaTac Airport with a beautiful indoor atrium area. Wonderful for photo taking. Thank you to my friend Aidan for the lovely photos!  🙂

The first project I tackled was a long black skirt to go over the bustle. I figured black would be a good staple, something that I could use in the future with other pieces if I needed to. I used Truly Victorian’s 1885 Four Gore Underskirt pattern with pleated back, and added pleating at the hem. The fabric was a black home decorating fabric with a bit of a sheen, picked up again at Jo Ann’s. This fabric was lovely, but was tricky to keep pleated. I ended up making my own pleater board out of card stock, but that’s a subject for another post. I used three rows of top stitching about an inch and a half down from the top edge of the pleats to hold them to the edge of the skirt, but they refused to stay up. When I re-wore this skirt for Steamcon III I revisited this skirt and tacked the top of each pleat up onto the skirt by hand for a more orderly appearance.

For an overskirt I found some chocolate brown smocked taffeta and used Truly Victorian’s Waterfall Overskirt pattern, shortened by about 4 inches in front and back. I used a beautiful desaturated gold/tan fabric I found at Hancock Fabrics for the lining and front ruffle. I was so stretched for time by this point that I was still sewing the ruffle on to the overskirt by the morning of the convention. I also found that using ribbon under the front of the overskirt to tack down some of the pleats helped with the look of the skirt immensely. On the day of the convention my friend Jean added two tiny hot pink bows to match my hair.  🙂

Me, Jean, and Claire showing off our awesome bustles. Fun Fact – Claire’s skirt and overskirt were made using the same base pattern as my skirt and overskirt. Huzzah for the magic of fabrics and pattern alteration.  🙂

All that was left was to accessorize!  I bought a small black felt top hat at the Ben Franklin Crafts, and Jean helped to cover the hat in matching black satin left over from my skirt and decorate with feathers and ribbon to match my corset. We made asymmetrical stretch lace gloves using a zig zag stitch and some black stretch lace, and made a choker from leftover fabric and lace scraps and a broach from the craft store.

The morning of the convention I added some long pink curled extensions to my hair, and that was that!  Jean and I wield a mean curling iron.  😉

Claire introduced me to The League of Steam at the convention, so I had to get a photo with Zeddediah the Zombie.  🙂

It’s Bustle Time!

The next project in preparation for Steamcon was to make myself a bustle. After having such great success with Truly Victorian patterns with my corset, I went to them again for the bustle, using TV101 and their precut bustle wire. This whole bustle went together in about a day and a half, but it would’ve gone much faster if my sewing machine had a ruffleing foot. I think gathering each ruffle was what took me the longest (it was murder on my finger tips, too.) But the result looked great, and you can’t see the hoop wire at all once it’s all under skirts.

The bustle is made to be hemmed a few inches higher than your outer skirts to reduce the likelyhood of stepping on it when going up stairs and the like, but it looks a little silly when worn all alone.  🙂 I was also very pleasantly surprised at how easily the bustle collapses for storage and ease of sitting.

Moving Up: Corsets and Bloomers, Oh My!

Working on the bowtie and bolero for my wedding had been a great kick start project for reteaching myself how to sew. It had gotten me to blow the dust off my inherited Bernina 1130 sewing machine, and reacquainted me to reading sewing patterns.

To set the stage, it was early October, 2010. Stu and I had just returned from our Honeymoon – we rode the Rocky Mountaineer Scenic Railroad from Calgary to Vancouver, BC.  It was fantastic and very relaxing, but by the time we got back I was itching for another sewing project. (You can take the girl away from sewing but you can’t take sewing away from the girl?) I didn’t want to accidentally stop sewing for another 5 years like had happened when I left home for college.  🙂

Conveniently, Steamcon was only a month away!  Steamcon is a Steampunk convention, held once a year outside Seattle, Washington. My friend Jean had just finished up making her first corset for the convention using the TV110 1880’s Corset pattern from Truly Victorian. Jean’s corset looked fantastic, so with a bit of help pinning and fitting, I set to work on making one for myself.

Ta daa!  I didn’t even have to make any pattern alterations after measuring myself and making a muslin mock up which is very rare and super fantastic. I used home decorating fabric from Jo Ann’s for the outside of the corset, lined with cotton denim for strength, and edged in light yellow ribbon. At the time I didn’t know how to make or use bias tape to finish edges, so I made due.  🙂

The chemise and drawers were made using Simplicity 9769. This pattern was great in terms of long term strength – there are no raw edges on the chemise because every seam is flat felled, but I do wish the sleeves were handled differently. They’re lovely, but they have a lot of bulk. I may make a new sleeveless chemise someday.  The lace is actually multiple pieces layered on top of each other to make a wide band around the neckline and sleeve cuff.